Tips for choosing the right lens
Every owner of an interchangeable-lens camera is faced with the pleasant dilemma of picking the most appropriate lenses to buy, then deciding which to use. However, there are no rules to go by; much depends on your personal style and what you already own. To help you decide which lenses to buy and how best to use them, we offer the following.
Normal lenses
 [the_ad id="89846"]
Today, many 35mm photographers opt for a short zoom instead of a 50mm, but both have their virtues. If you need a fast, general-purpose lens in the f/1.4-f/2 range for available-light work, nothing can beat a 50mm. Positives: Usually more compact, lighter than a short zoom; often less costly; generally very sharp; provides brighter viewing image.
Negatives: No zooming; you must compose by moving the camera. Short zooms offer framing flexibility, often in a package not much larger than a 50mm lens. A 35-70mm f/3.5-4.5 is usually the smallest and least expensive, but a 28-70mm f/3.5-4.5 is more useful for shooting interiors, vistas, and cramped quarters because it gets down to 28mm. If you shoot portraits, nature, or sports at close range, consider a compact 35-105mm or a 35-135mm zoom.
positives: Equivalent to two or more single focal length lenses in a handy, responsive package, it provides intermediate focal lengths; there's less need to switch lenses. Normal zoom negatives: Moderate aperture (typically f/3.5-4.5) limits low-light shooting and focusing precision with manual focus, affects viewing brightness. Zooms tend to be larger, heavier, more expensive than 50mm lenses.
Wide-angle lenses
 [the_ad id="89848"]
They range from 24mm (bordering on ultrawide) to 35mm (bordering on semi-wide). As with normals, the choice is between very compact, single-focal-length lenses of relatively wide aperture (f/2-f/2.8, a few f/1.4s) and moderate-aperture zooms (around f/3.5-4.5), which provide superior framing flexibility.
For positives and negatives on both types, see the normal-lens section above. Many wide zooms, such as 24-50mm, 25-50mm, 28-50mm, etc., encompass normal as well as wide-angle focal lengths, which is an advantage.
A few (for example, 21-35mm, 18-28mm) combine ultrawide (21mm and below) and wide focal lengths (see the ultrawide section below). Many are not much larger or heavier than 50mm. Although 25-50mm or 21 -35mm may not sound as impressive, it's the zoom ratio (long divided by short focal length) that counts. If you need a really fast wide-angle (for example, 35mm f/1.4, 28mm f/2, 24mm f/2) for available light or shooting handheld with slow film, stick to single focal lengths.
Ultrawide-angle lenses

[the_ad id="89850"]
With focal lengths of 21mm and below in 35mm format, they provide extreme angular coverage of 90 degrees or more.
Positives: Ultrawides, by virtue of low image magnification, provide great depth of field; more likely to yield sharp-looking images when handheld at slow shutter speeds. Excellent for expanding tight interior spaces, capturing vistas; for intimate photojournalism, street photography.
Negatives: Apparent perspective distortion, though useful for dramatic or comic effects, is problematic in portraiture. Avoid placing subjects near edges of the frame or prominent features, such as noses, in the foreground.
Medium tele lenses
 [the_ad id="89851"]
Sometimes called portrait lenses, these optics in the 85-135mm range are fine for portraiture, minimize apparent perspective distortion, and provide convenient working distance when shooting faces close up. Many tele zooms work well in this range, but they're heavier, longer, and slower than single focal length lenses. If you shoot a large percentage of portraits, you should consider getting an 85mm f/2, 100mm f/2, or 105mm f/2.5, even if you own a tele.
Positives: They allow discreet photography of people without the perspective-flattening effect of long teles; single focal length type combines fast aperture, bright viewing image, good image quality. Negative: For zooms, see above; for single focal length, fairly specialized.
Long tele lenses

[the_ad id="89852"]
Traditionally, any lens over 135mm for 35mm photography is long tele. Today, the most popular by far are zooms in the 80-200mm or 70-210mm range. Unless you need a lens that's very fast and very long (such as the optically superb but large, heavy, and very expensive 300mm and 400mm f/2.8s used by professional sports photographers), a tele zoom is the most flexible and economical choice. For many photographers, a 70-210mm f/3.5-4.5 (especially one with macro) is the only long tele they'll need.
Positives: Reasonable size, weight, and price, wide range of uses nature, sports, people, portraits, scenics. Negatives: Moderate and variable aperture; mediocre performance unless stopped way down.
A number of surprisingly compact 100-300mm f/5.6s are now offered for those who need a bit more reach, and there are a few fine 200-500mm f/5.6s for those who need really long teles for such things as long-distance sports close-ups. Long tele zoom
Negatives: larger size and weight.

11 Tips for Home Photo Shoot
When you are selling a home, there are various things that need to be done prior to having a professional photographer shoot the home for marketing purposes. Home staging, cleaning, minor upgrades and repairs, and ensuring the grounds are kept up can be a little overwhelming when you have so many other things you need to take care of.
But this is something that needs to be done if you want your home to look its best and help sell your property faster. There are definitely different challenges involved. The following tips can help make your life much easier when shooting homes for sale.
1. Turn on all interior lights
When you are preparing for your next photoshoot, one of the most important things to remember is to turn on all interior lights. This will provide the best possible lighting for the best presentation of your home. Not only does it look better, but also avoids spending hours editing photos later in post-processing.
2. Clear off countertops in kitchen and bathroom areas
Clear off countertops in kitchen and bathroom areas. Remove any document, mails, toothbrush holders, soap dishes, or other items that might be hanging on the walls.
3. Make all beds and tidy bedrooms
Make sure to tidy-up the bedrooms. Remove any clutter and make both beds. Leave clean sheets, blankets, pillowcases, and comforters in an organized manner. The room should appear polished and clean.
4. Move pets out of sight
If your pets are like mine, they like to be in the center of attention. So when you're taking photos for your service, don't risk them "stealing the show" by setting up a photoshoot where they could potentially ruin your shots. I would advise against this as it could lead to the wrong message being portrayed in your home photos.
5. Move all vehicles from driveways
Please check that all vehicles have been moved from the street/driveway in front of your house to “off-street” parking before our photographer arrives. We also ask that each vehicle is out of the driveway and not in the line-of-sight from camera to house (even though this will NOT be in the article) before our scheduled photoshoot time.
6. Move garbage cans
Garbage cans, recycling bins, and other obstacles will only get in the way of your photoshoot. The most important thing is to be prepared and make sure the area you plan on shooting in is clear.
7. Move all garden tools
Photoshoots can be fun, especially when you're going to the beach. But have you ever taken photos of a garden or outdoor area? The first thing you should do is remove all the garden tools. They might seem like a good idea because they're hand-crafted and unique, but you'll end up with them strewn all over the photo.
8. Mow and rake the yard
Get set for your shoot by cleaning up your props, mow and rake that yard to get it looking its best.
9. Sweep driveways
One important step of planning a photoshoot is to prepare the location. Sweep any leaves, sticks, or other debris from the location and make sure sprinklers are turned off.
10. Remove photos, notes, and papers from the refrigerator
Get rid of clutter in the refrigerator. Clean off and remove photos from the refrigerator door and post. Remove notes, to-do lists, and other papers from the door.
11. Turn ceiling fans and televisions off
Make sure your ceiling fans are turned off. If they are on, they will be visible in your photos. Not only will that cause obvious problems, but you’ll also capture unneeded noise from the ceiling fan, which will cause blur in your photo.

The key success of Real Estate photo editing workflow
Real estate photography is an important part of any realtor's marketing strategy. There are several reasons for this, the most important being that photos can significantly increase a home's value.
A lot of people think that professional photographers don't do any post-processing, but this is not true. Shooting and image post-processing are two different things. Image editing is a necessary part of the photography process, even for pro photographers and those who use simple point-and-shoot cameras. Professional real estate photographers will spend hours on end perfecting their images to make sure they have exactly what it takes to sell a home or commercial property.
How do we make our photos stand out? It’s a question many of us ask, and it’s important to find the right balance.
In the real estate photo post-processing workflow, working on brackets shot is a technique that allows you to choose the image that works best when editing manually in Photoshop by using the masking technique. Today we are going to talk about Real Estate photo editing workflow in Photoshop. It can be tricky so let's look at the key success of this work.
Color Correction
The first step to successful color correction is understanding the tone of your photo. Things like a wall, the floor, and other objects in the scene must be taken into account when retouching your photo. It's best to start with a RAW file because it gives us more accurate information on how you want your final product to turn out during the blending step.
Color cast removal
The color of a house can have a major impact on how it appears in photos. Even the slightest tint or color cast can change the mood and tone of your photo, which is why you should be aware of how colors affect photography. To make sure that your pictures come out just right, you'll want to avoid any kind of unwanted color casts that might be present in your image.
Shadow removal
The small things, like shadowing, can make a huge difference in the outcome of your photo. Even if you're not sure what's wrong with it or how to fix it, you should always keep an eye out for shadows and tweak some settings. Otherwise, shadows will take away from the clarity and make your picture look dark than it should. To avoid this problem, try taking away or reducing such shadows to produce cleaner and more appealing photos.
Reflections removal
They reflect light from whatever source be it the flash, the reflector, the sun, or even the photographer. These are all factors that necessitate photo retouch during post-production to minimize reflections or removal in scenes. The color of light, the subject matter's surface texture, and the angle at which a photographer chooses to shoot from all contribute to how much post-production needs to be done on an image.
Window detail and blue sky
The glass windows in a house are the perfect way to show off all of the wonderful details that make it such a great place to live. But novice photographers often overlook these small things, even though they're what makes this home uniquely theirs. That's why we use flash to capture them after dark—to reclaim these beautiful details for our memories. Flash lighting can make photos look harsh, so it's up to post-processing retouch work to soften it and make the photo more true to the eyes.
Vertical and Horizontal Alignment
Shooting in a very narrow room with a very wide lens sometimes causes what is called linear distortion. Image correction can help your photos look professional and more beautiful, especially when it comes to real estate photography - something that shouldn't be overlooked. The straight lines of your images are important and can make the difference between a great image and a bad one. It's important to edit your work before you send it off - even if the distortion is just a little bit. When an image skews, it may also change how viewers perceive emotions and perceptions. So make sure you're editing before posting!
Unwanted object removal
Sometimes, when we take a picture, something might not work. For instance, the photographer's reflection on the glass and the camera tripod that captures our every move. It is these unnecessary details that can make an image look bad and not as beautiful as it should be- right down to power cords and towels hanging around the edges of the frame.
Sometimes, when we take a picture there are some things that just shouldn't be in there- like reflections from a mirror or camera tripod capturing your every move. These unnecessary details can really make an image look bad if they're not removed before you click "save."
Clarity and sharpness
When all of the steps have been completed with image editing, it's important to consider the clarity. There are two different types: sharpness and blurriness. Sharpness refers to how much detail is in an image, while blurriness is a general lack of detail or clarity. It can be difficult to tell if an image has too much sharpness or not enough because there are so many factors that affect this (such as the size and purpose for using images). However, you know when an original blurred image should be adjusted because it will no longer show any quality after adjusting it.
Sky Replacing
When you're looking for an exterior image, It may not have as much detail as interior photography and sometimes you won't be able to change the perspective. In all the best pictures, there should be a sky that fills up your entire view. The color of the sky depends on the temperature and atmosphere in each picture. For example, if you're looking at a picture from Arizona in wintertime, it might have blue skies but then again if you're looking at Minnesota right now, we've been having some really clear days with plenty of sunshine so the sky is typically going to be a more muted greenish-blue color. As for rivers and seas, they should always be blue because water reflects light.
If you're looking for a way to make your photos come alive, there are many techniques for doing so. One that I've found works well is replacing the nice sky with similar colors and tones. This doesn't just mean changing the hue but also adjusting it to add warmth or coolness to the picture depending on what sort of mood you want to create in your photo.
Lawn grass adjustment
Sometimes, the grass in our yard is not as beautiful as it should be and we forget to adjust it. But when we take a step back and look at what other things are going on with the lighting and shadows around us, then maybe adjusting the lawn just a bit will make all that beauty shine through.
Some people are so focused on enhancing their images that they forget about how their buyers will react once they see them. Be careful not to deceive potential customers by presenting an image that is completely different from what they expected.
It's important to remember- especially when trying out new techniques in Photoshop- that potential buyers want photos that look like reality; not too heavily edited or fake looking. When enhancing images make sure to keep your customers in mind rather than going overboard and making your photos look unrealistic.
Getting started in the real estate photography business
To be a successful real estate photographer you need to invest in the right equipment. The most important requirement for our trade is a camera. A good digital DSLR with interchangeable lenses should be your primary purchase and investment priority after that, depending on how much cash flow you have leftover, other investments can include: lighting gear, memory cards, backdrops/props, and more. This isn't an exhaustive list but it's just giving you some ideas of what your next priorities should be so get investing!
DSLR camera
To get started, you're going to need an interchangeable lens camera. However, if your camera doesn't allow for a wide-angle lens like those found on DSLR's then it might not be the best option for photographing large spaces. You'll also want to make sure that your camera is able to trigger external flash units as well and has manual mode capability so you can control shutter speeds, aperture settings, exposure compensation values, and more.
[the_ad id="85591"]
A Wide-Angle Lens
You need a lens that has an effective focal length between 16 mm and 24 mm. Preferably a zoom lens to give you more flexibility in varying situations. When it comes to wide-angle lenses, size matters!
[the_ad id="85362"]
A sturdy tripod
A tripod is an essential tool for shooting brackets. Without it, you will have to take the time to manually adjust your settings each time you shoot a bracket, and if there is any movement between brackets then the images won't line up pixel for pixel.
[the_ad id="85360"]
Light Stand
One of the most important things you need to remember when shooting interiors are getting your flash off of the camera. You will not only have better quality light, but there are more options for bouncing the light off walls as well, which is essential in this type of setting. One stand that has proven quite useful is a light stand like this one because it can be used with a very small footprint and can be configured high or low depending on how you need to use it.
[the_ad id="89680"]
Flash Unit(s)
The process of using a flash to light your subjects is not as hard as it seems. You don't need hundreds and thousands of dollars worth of equipment to do this technique. All you need is a camera that has the capability for manual mode on the flash unit, which can be triggered by your camera.
[the_ad id="89678"]
Flash Trigger
If you want to get your flash off your camera then you’ll need a way to trigger it. One of the best and most convenient ways is with infrared remote control.
Bracket Processing Software Application
As a result of interior lighting issues, real estate photographers now have the option to use bracketed images in order to solve these problems. They can shoot several images at different exposures and then process them with specialized software. The output needs to be more creative and engaging!
Post-Processing Software
The post-processing of your images is an important step in the process. There are many different options to choose from, but Photoshop is best for real estate photography. It is an essential part of the process if you want to do more advanced techniques, like replacing skies and masking interior windows.
Accounting Software
The world of business is hectic. One thing that can help simplify the process and organize your business is some kind of software like QuickBooks. Another alternative to keeping track of things would be to hire a bookkeeper, but either way, you'll need to keep accurate records for taxes and make sure clients are paying on time.
Business Name
The first step for starting a business is to come up with the name of your company. This should be something that you can easily remember and relate to you or your services, and preferably have a domain that fits with what people are looking for when they search online. You could compare some of the top searches in Google Trends to see which words people are typing into google most often to get an idea of how popular it may be.
Domain name
The next step is trying to find out what kind of domain names might work best for you. If you want customers who are searching by keywords on Google, then make sure that both your website's name, as well as its URL address, fit those keywords. This ensures that more people will be able to find their way.
It's understandable that you want to have a domain name that reflects your location and what the company does. For example, if you are doing real estate photography in Bangkok then choosing a domain like "BangkokRealEstatePhotography.com" will allow potential clients to find your site more quickly than "JbPhoto.com." Therefore, it is much better for you to choose a company name of Bangkok Real Estate Photography rather than Jb Photo.
Business Insurance
When you're shooting inside someone's house, it's important to protect yourself and your gear. Equipment insurance will help protect against damage that could happen when you accidentally damage a homeowner's property. But should something unexpected happen while you're on-site, like say if one of the homeowners slips and falls in their own home because they weren't expecting company or an animal escapes from its cage? You'll need liability coverage too.
Business License
In order to be a successful entrepreneur, you need to stay on top of local and federal laws. These include business licenses which are sometimes required by your city or county government in order to collect all taxes that are due. If your state, province, or country requires businesses to collect sales tax they will need to register with their respective government entity for the right to do so.
Legal Protection
It's important to separate your personal assets from your business assets for a number of reasons. If someone were to sue you, they would only be able to take the profits from your company rather than taking all of the money you've saved up over the years.
Reliable Vehicle
A few important things you should be aware of when it comes to your real estate photography business is showing up to the shoot location on time. To do this, you'll need a reliable vehicle that can sustain the wear and tear of travel. Keeping your vehicle in good shape will keep it reliable and dependable for all those miles.
Smartphone
You'll need to be available by phone. Real estate agents have a lot of responsibilities and they spend most of their time on the phone with other people coordinating deals and communicating what needs to happen for them to do their job. They expect you to respond immediately when they call so that you can schedule a photoshoot sooner. You need to be able to communicate quickly with them--either through email or by using your Smartphone.

The summary of Real Estate Photography that should be aware of
Photographing real estate is more than just taking the picture of a house or condo, it's about showcasing all the features that will draw in potential buyers. It's not as simple as snapping a few pictures and sending them off to your client either, you need to know what makes a great photo and how it can be used for marketing purposes so you can show off the property at its best.
Here is a summary of some of the major differences you need to be aware of:
- You need to work with a wide-angle lens. The best 35 mm effective range is between 16 mm and 24 mm. The closer to 24 mm you can keep images the better.
- Lighting is a challenge because the same image can have a bright window and a dark corner in it. There are many techniques for dealing with this wide contrast range you will encounter when shooting interiors.
- Verticals and horizontals are super important. The viewer’s eye/brain expects key parts of buildings to be vertical and horizontal. Horizontals and verticals that aren’t straight become a major visual distraction.
- All wide-angle lenses have barrel distortion that must be removed with post-processing software. In other environments, many of these items are not as important, so learning to control these issues can be a big change for some photographers.

Time Is of the Essence
Photography done for real estate agents adds a compressed time demand. That is, you will typically only have a few hours to shoot the photos and you will be expected to deliver them ASAP or at least within 12 hours. Twenty-four hours is a long time to deliver real estate photos. This is simply because you are operating as a part of the agent’s rushed time schedule. Get used to it, it’s part of the business! This ASAP thing is not the agent’s fault. Once the listing agreement is signed, home sellers want to get it on the market yesterday.

The Speed/Quality Trade-Off
Because of this emphasis on shooting and post-processing images quickly, you will find yourself continually trading off speed and quality. One of the most important areas for trading off speed for quality is deciding what your approach will be to lighting. Only having a few hours to shoot the inside and outside of a home forces you to be efficient and frugal with your lighting style. About half of real estate photographers use multiple small flashes and half use some form of bracketing.
Bracketing software takes more time in post-processing on the computer when you get back to your office. Using multiple small flashes has a much lower overall workflow time but there is more of a learning curve to using them. You’ll need to decide which solution for lighting you are going to use.

Generally speaking, real estate agents are not as likely as photography enthusiasts to discern the difference between good quality interior photography and high-quality interior photography. Make sure that you are delivering an appropriate level of quality for what you are charging and what you're competing against. In large metropolitan areas where there are many real estate photographers competing for the same business, high quality is a bigger competition factor in your success than it is when there’s very little competition.

6 Ways to Market Yourself as a real estate photographer
Are you a real estate photographer trying to find the best way to market yourself and your business? If so, then this blog post will be perfect for you. In this article, we explore some of the most effective ways for photographers like yourself to get clients without having much experience in the field.
A large part of marketing yourself as a photographer is making sure your name gets out to the right people, perhaps real estate agents who are currently listing properties and want someone to capture their properties on film or a new home builder. By getting your name out there you can be there right in front of the person that needs your services when they finally decide they need a professional to help make their property stand out from the other ones in their neighborhood.
There are a number of ways to market yourself as a real estate photographer, some more traditional than others. I’ve tested a lot of different marketing techniques and wanted to share the top 6 that work!
1. Referrals
This is where one client tells their friend that you did a wonderful job of photographing their last listing and were very easy to work with. This is the MOST effective way to get customers. It’s so important that you will want to keep careful track of who is referring their friends to you, thank them and cultivate future referrals. You also want to directly and clearly ask your satisfied clients to refer their friends to you. Some will not even think of referring, but when asked, will be happy to refer to you. On the back of your business card and on your invoices, put something like, “The biggest compliment you can give me is to refer your friends to me.” Good agents use this technique very effectively for their own marketing and will understand immediately. So your first step is to create some satisfied customers to start referring their friends and associates to you. Somehow, you need to get to know some listing agents.
Ways to Get to Know Listing Agents
Here are some ways to make personal contact with listing Agents:
- Direct phone calls.
- Visit them at open houses.
- Give presentations at office meetings.
- Do portrait shoots at real estate offices.
Making personal contact is always the best approach. Knowing something about their listings will give you something in common to talk about. Also, when you go to a real estate office, if you know who all the “big dogs” are by name it will help guide you to making contact with the top agents.
2. Face-to-Face or Direct Phone Contact
An effective way to get new clients is to use your list of top listing agents, call them up, and tell them what you can do for them. These agents are important enough to potential customers that you may have to make a personal appointment with them to get your message across. It’s important to be concise and have presentation materials to leave with them. Another effective way to handle initial contact with an agent is to email them or send them a flyer or postcard with your information. Then in about 3 days, when you know they have the piece, call them on the phone and discuss the material you sent them.

Before you talk to a listing agent, take the time to do your homework and review their current listings. Look at their photography. Come up with specific ideas of what you can do to help them make their home marketing more effective. They’d love to talk to someone that has specific ideas for them about their listings. Note that when you have something very specific to talk to an agent about (the photography on their current listings), talking to them is much easier than “cold calling” where you really don’t have anything specific to talk about that you know they will be interested in.
3. Face-to-Face Office Meetings
This is the second most effective marketing method. When starting out, most real estate photographers need to do this to “bootstrap” their business. In the more developed real estate photography markets where other photographers have been doing this, it may not work as well as in areas where there is very little real estate photography going on.

You can call any real estate office, ask for the managing broker and tell them you’d like to come to the next office meeting to make a short presentation of your photographic services. In this context, short means not more than 5 or 10 minutes. To convey information in this time frame you’ll need handouts with all the key points, example photos, and key benefits, so all agents get a copy to take services. It’s useful to carry a copy of your portfolio in a loose-leaf book or on an iPad so if you get the chance to show people your work you have it ready to view. Going to office meetings is a less effective method than contacting agents directly because the top listing agents frequently don’t attend meetings; they are out doing deals instead! If you go to office meetings, do your homework ahead of time. Know the names of the top listing agents in that particular office and be able to recognize who they are. These are the people you want to connect with. Don’t be surprised if the top listing agents aren’t even at the meetings. These office meetings are designed by the managing broker to motivate the newbie agents. The top listing agents are self-starters and don’t get much out of office meetings.
4. Team With Home Stagers
The best listing agents work with home stagers, so a great way to connect with them is to find the stagers in your area and get to know them well enough to cross-market each other’s services. For example, you could offer a stager a reduced price to include your services along with theirs in a package deal for listing agents. The stager will probably already have a list of agents that are regular clients. Any agent that spends money on staging also spends money on photography. Also, stagers need photographs of their work to promote their services and many of the stagers I’ve met are lousy photographers, so there is a natural opportunity to strike up business relationships with stagers.
5. Postcards or Flyers
You need some form of professional-looking printed media that you can hand out to prospective clients or send them in the mail. A great way to do this is to create a jumbo or panoramic size gloss postcard that shows off your work and promotes your services. Use only the best shots in your portfolio and hire a design professional to do the layout if you don’t have these skills. Use large photos to display your photography. The great thing about a jumbo or panoramic postcard is that it can be used either to handout or to mail. Use these jumbo postcards like a business card, but be careful, they are much more expensive than business cards.
Most real estate offices have agent mail slots out where anyone can leave mail items for agents. This is because, traditionally, Marketing Techniques flyer distribution vendors distribute flyers for homes this way. So you can take a stack of your postcards or flyers and put one in each agent’s mail slot in an office. Be sure to talk with the receptionist and ask permission. Different offices may have different rules about putting things in agent mail slots. Distributing marketing materials like this can save a bundle on postage. Don’t depend on postcards or flyers as your primary or only method of marketing. Use them to remind the agents you’ve talked to or met that you are still out there looking for work.
6. Email

Real estate agents are used to both sending and receiving email marketing. However, a large percentage of them don’t like this type of marketing and have their SPAM filters turned on high. However, opt-in (where clients choose to receive an email newsletter from you) is one way to keep in touch with clients. If you use email marketing, it is useful to do a follow-up phone call a day or two after sending the email. A good approach with email marketing is what is called “drip marketing.” This is where you send an email to all the agents you have shot for or worked with. Send an email to them all once a quarter showing them some of your recent work. The primary idea of drip marketing is to keep in contact with your regular customers so they don’t forget you.

The Key point of Real Estate Photography Marketing
Effectively marketing your business means being able to talk to potential clients in a variety of situations from a short ride in the elevator, to a brief phone conversation, to a longer presentation for a group of real estate agents at their weekly marketing meeting. You need to have your “pitch” distilled down so you can quickly and effectively describe why the potential client you’re talking to can’t live without the service you are providing. Keep in mind the two primary problems that you as a real estate photographer can solve for listing agents are:
- Generating more showings for a listing.
- Attracting more home sellers that want them to list their home with them.
Great real estate photography does both. These marketing points are the key facts and data that you need to use in all of your marketing materials. The best facts and data are ones that come from industry studies that are published by authoritative publications. Even though many of these facts about real estate photography are obvious to most people in the real estate industry, they just carry more weight if they come from an article in a source that agents consider authoritative.

The following are marketing points that real estate photographers need to understand and be able to discuss with their potential clients:
1. Home selling starts on the Internet. Homebuyers first find homes they want to come to look at on the web. They have hundreds of choices in their price range and tend to eliminate the possibilities from the single exterior property thumbnail photo.
2. Very few real estate agents have the equipment or skills required to do quality real estate photography. It takes more than an inexpensive point-and-shoot camera to create effective property photos. It takes a practiced eye for composition, an ultra-wide-angle lens, photo editing software, and the skills to use them.
3. Paying for professional photography is inexpensive and has a big payback in the overall scheme of marketing a property.

4. It’s always been obvious that real estate photography is central to marketing homes, many independent studies have statistically confirmed that properties that have professional photography used in their marketing sell faster and for more money.
5. In a depressed housing market where home prices have fallen and the number of properties on the market has risen, the use of professional photography is even more important. Good photography draws attention to properties in a crowded market
6. When listing agents compete to list a seller’s home the home sellers frequently are choosing the listing agent based on how successful agents have been at selling other homes in that neighborhood. Good marketing photography is something that the neighbors will notice and it will bring them more listings in that neighborhood. This is because home sellers in general are quick to see the benefits of good marketing photography and want it used on their home.

Tips for the advertisement photography market
Advertisement photography is by far one of the most competitive forms of photography. This is mainly due to the fact that you can earn far more money than in any other aspect of the photographic industry.
Everyday companies pay millions of dollars on an advertisement; with one goal - to sell their product. Companies want to tell the reader that their product is best - so you must be able to match this.
The photographer's work must be to the highest technical quality and he/she must have the ability to create a masterpiece from something simple. Close enough is just not good enough. Close enough will not sell a product.
[the_ad id="88452"]
To become an advertisement photographer one must first understand the market and understand what the client is looking for. The best way of understanding this is to pick up a magazine and look at the ads. Study each image. Study the images you see on billboards or images that are used to advertise movies.
Most parts of advertisement photography can be classed as still life photography. So if you are interested in taking images for the advertisement market your first job is to set up your own home studio. This can be a great place to practice.
Everything in your home can be photographed. Start off with a few glasses. But remember you are not trying to make the glasses look nice - you are trying to sell them.
The second thing you need is a large-format camera. Buy a range of the best lenses. Slide film is your best choice for advertisement photography. The client may want to blow up the images to billboard size.
[the_ad id="88452"]
The most important thing when starting off is creating a portfolio of your work. This can be sent to advertising agencies or can be shown directly to a company. Always have a few copies on standby. Also, set up a web page. Online advertising is growing at a spectacular rate. Your portfolio should also consist of a different range of images.
If you are thinking of using an advertisement agency, get their guidelines from them. These should be very helpful to you in understanding the market. Dealing with a well-established agency should be very profitable for you if your photography is to par.
Advertisement can be seen everywhere - and about eighty percent of all ads use photography. Most advertisement these days consists of a few words and a stunning picture that should attract the viewer is attention.

What every photo researcher ought to know about buying stock photos
If you've been a photo buyer for your magazine or site for any length of time, you probably realize how much the photography industry has changed.
Many professional photographers are now using high-quality, high-res digital cameras instead of film for their stock photos. Read below to find out the easiest way to locate and purchase digital stock photos for your magazine, brochure or website.
Where to Buy Stock Photos
One way to find stock photos quickly and easily is through a stock agency Web site. Stock agencies provide several benefits.
- They offer a large inventory of stock photos by many different photographers.
- You can choose from a variety of styles, colors, photo sizes, and quality.
- With digital stock agencies and portals, you can normally buy right from the site without having to put in a request for certain images
- You conveniently have 1,000s of stock photographers in one location instead of having to sift through individual photographer's stock photo submissions sent by parcel post. As you know, postal mail doesn't come with a search box!
- With a stock agency or stock image portal, you can save time because they offer uniform buying guidelines, download methods, and search capabilities no matter which photographer you choose.
Individual Photographers
Another way to find digital stock photos on the Web is to contact a freelance stock photographer directly. You might need to work with a photographer one-on-one if ...
- You need stock photos for a specific location or with a specific theme, and are unable to locate the photos you need, or
- You'd like to assign certain projects to one photographer who specializes in that field. It is even possible to work with some stock photographers by setting up an "on spec" relationship.
This means that you give the stock photographer your photo needs and he/she shoots images with the understanding that you may only purchase one or two (or none) of the stock images.
Working "on spec" may be easier to set up than you may think, especially if you catch the stock photographer during a slow photoperiod.
"On spec" is many times a win-win for the stock photographer and the stock photo researcher.
This is just one example of how the Internet makes it possible to work with one or many photographers and transmit your photos quickly by email or by download from a photographer's Web site.
Quality and Size of Digital Photos
Probably one of the most confusing aspects of buying digital stock photos is how to determine the size and quality of an image.
When you receive photo submissions by postal mail, you have the actual photo print or transparency in hand, making it easy to determine if the quality and size are adequate for your project. However, with digital photos, it's not always that easy.
Formats Used in Digital Stock Photography
JPG (or JPEG) format, which is one of the most popular formats for digital stock photos, enables the photographer to reduce an image's size tremendously for emailing to photo buyers while retaining the size and quality needed for most magazines and publications up to even a two-page spread.
Most digital stock images are displayed as thumbnail images, and then high-resolution (high-res) images are emailed at the photo buyer's request.
Warning: A major drawback of using JPG digital files for photos is, if the photo is re-saved over and over it will lose some digital information each time it is saved. So, it's a very good idea to save a JPG image as a Tiff file as soon as you receive it. This way you can save it without sacrificing quality.
Fortunately, most stock photo agencies require that images be of top quality before they're accepted. This eliminates your worries about the quality of images in many cases, but always make sure the size of the stock image fits your needs before making a purchase.
Model / Property Release
If you plan to use your stock image for advertising purposes, or for some editorial use, you may need a model or property release. Check with your magazine or client and do some research to make sure which images will need a release.
Licensing Agreement for Digital Stock Photo Usage
Also, read the photographer's licensing agreement carefully so you'll know how, where and the length of time you can use the photo.
The general rules of usage still apply when buying stock photos on the Web. That's another reason to work with a dependable stock agency site or directly with a professional stock photographer.
Use these tips to help locate great digital stock photos easily, and when you need them!

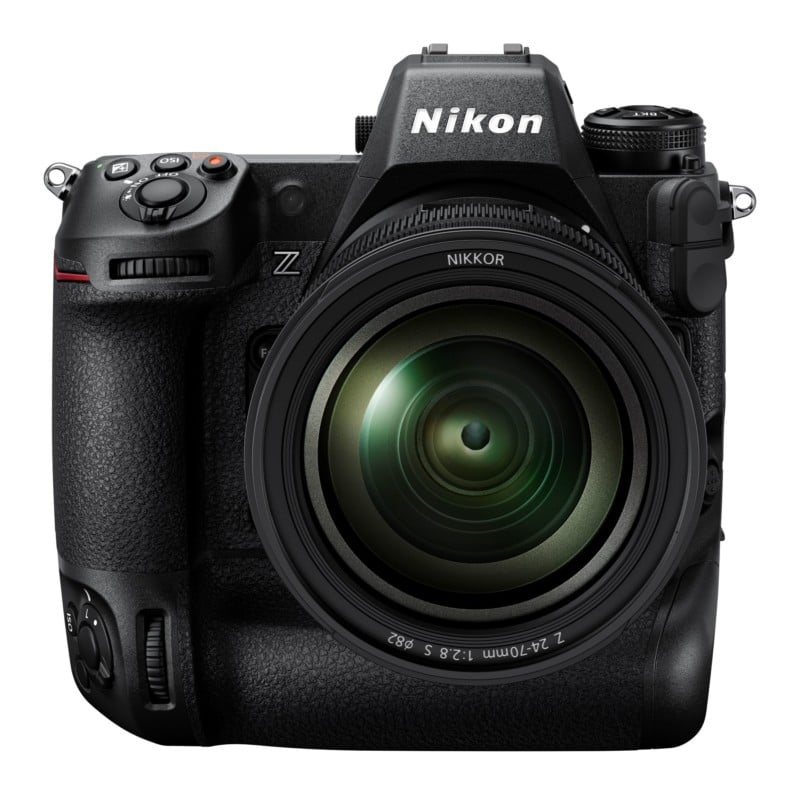
Nikon Announces Development of the Z9 Full-Frame Flagship Camera
Nikon has announced an “unprecedented imaging experience” by revealing it is developing the Z9 full-frame flagship mirrorless camera. The camera will feature a newly-developed FX-format stacked CMOS sensor, a new processor, and support 8K video.
The z9 is Nikon's most advanced Z mount camera, and it is a true game-changer. It offers the world's first top-of-the-line full-frame 45.7 MP live MOS sensor, Dual D4S image processors, lightning-fast speed of up to 11 FPS continuous shooting, 10 fps with autofocus, a new 180k dot 3,686k dot ultra-high-resolution electronic viewfinder that matches the brightness of the LCD screen at 921k dots and feels like an optical finder (pointing at the sun will NOT cause a glare), 4K and 8.

Nikon z9 from Nikon compact full-frame camera featuring a 45.7-megapixel back-illuminated full-frame sensor with no optical low-pass filter and an expanded sensitivity range up to ISO 3,280,000, Z-series electronic viewfinder with an eye point of 20mm (0.77 inches) and 100% coverage of the frame, 3.69M-dot organic EL electronic viewfinder with approx.1.53x magnification and a wide-angle of view (100 degrees horizontally x 75 degrees diagonally).
 It is a mirrorless interchangeable lens camera that leverages the next-gen full-frame Nikon Z format in all of its glory to produce images with extreme resolution, crystal clear colors, and true to life tones. It features a 30MP CMOS sensor with no optical low-pass filter for stunningly sharp pictures. An impressive lineup of professional-grade lenses, including f/0.95 full-frame prime lens and 200mm f/2 super-telephoto prime lens provide a wide range of creative possibilities. This model comes in a Titanium color that is darker than Fusion Chrome.


As seen above, the Z9 will use the integrated-grip style body, a favorite among some professionals because the form factor allows for an even shooting experience regardless of orientation.
Earlier today, Nikon Rumors posted a very long list of expected features for the Z9, including the name of the new camera. The rumor also stated that the camera was tested with a range of different megapixel sensors from 45-megapixels to a 60-megapixel version. Other features rumored include 20 frames per second through a blackout-free EVF (like the Sony Alpha 1 and Alpha 9 series), a 16-bit RAW option, a new user interface, and improved noise levels and better dynamic range. Nikon Rumors claims the camera will be tested at the Tokyo Olympics and is expected to be released in the fall of 2021.
[the_ad id="88452"]